Novelty ID Photo Guide: How to Take, Prepare & Upload Your Best Photo
A comprehensive, step-by-step master guide for capturing professional portrait photos and high-contrast signatures for custom novelty ID keepsakes. Modeled after official U.S. identification and driver's license photographic standards, this guide covers smartphone calibration, 45-degree diffused lighting, CR-80 card composition, DIY backdrops, and JPEG/PNG 10MB upload requirements.
To achieve authentic, professional aesthetic quality on your custom novelty ID keepsake, idgaga recommends capturing portraits that align with standard U.S. official identification and driver's license (DMV/Passport) photographic benchmarks: a front-facing, eye-level portrait with a neutral expression against a plain white or light grey backdrop, illuminated with even front lighting to eliminate shadows. The idgaga upload system accepts JPEG, JPG, or PNG image files up to 10MB (10,240 KB) per file for both portrait photos and signatures directly within the product customization form.
1. Platform Technical Requirements vs. Official Standards
Understanding system upload constraints versus professional credential standards.
Platform Technical Constraints
Enforced by the upload engine
-
Supported Formats: Strictly
.jpg,.jpeg, and.png. -
Maximum File Size: Up to 10MB (10,240 KB) per upload.
-
Resolution Flexibility: No arbitrary crop locks. Original high-res uploads are scaled proportionally into specimen templates.
Official ID & DMV Standards
Benchmark for authentic keepsake realism
-
•
Neutral White Backdrop: Solid white or light grey with 3–4 ft subject clearance.
-
•
Front-Facing Demeanor: Squared shoulders, level head, looking straight into the lens.
-
•
Unobstructed Visibility: Full facial oval visible from hairline to chin; no dark sunglasses.
2. U.S. Official Identification Photographic Standards as a Quality Model
How standard passport and DMV criteria ensure authentic keepsake realism.
Recent Likeness
Taken within the last 6 months to reflect your current physical appearance accurately.
50%–69% Head Height
Head occupies approximately half to two-thirds of frame height, centered with 10–15% headroom.
Neutral / Approachable
Relaxed facial muscles or subtle closed-mouth smile; both eyes open looking at the camera.
Full Facial Oval
Hair pulled away from eyes and brows; hats and dark sunglasses removed.
3. Camera & Equipment Setup: Maximizing Smartphone & DSLR Results
Detailed calibration techniques for mobile devices, dedicated cameras, and tripod mounting.
Mobile Phone Calibration
- • Use Rear Lens: The primary rear camera provides superior optical resolution over selfie lenses.
- • Wipe Clean: Clean finger smudges off the glass with a microfiber cloth to prevent light haze.
- • Enable Grid Lines: Turn on 3x3 camera grid to align eyes along the top third axis.
- • Stick to 1x Optical: Avoid digital pinch-to-zoom which degrades sensor resolution.
- • Disable Beauty Filters: Turn off AI skin smoothing filters that blur facial contours.
Dedicated Camera Optics
- • Portrait Focal Length: 50mm to 85mm full-frame equivalent for zero barrel distortion.
- • Aperture (f/4 to f/8): Ample depth of field keeping nose, eyes, and ears pin-sharp.
- • ISO 100–200: Base ISO setting eliminating digital chroma noise and sensor grain.
- • Shutter ≥ 1/125s: Fast shutter speed preventing micro handheld motion blur.
Tripod & Timer Operation
- • Eye-Level Stand: Mount phone on a tripod level with the subject's pupils.
- • 3–10s Self-Timer: Use a self-timer or Bluetooth shutter remote to eliminate touch vibrations.
- • 4–6 Ft Distance: Maintain proper shooting distance to prevent wide-angle distortion.
4. Lighting & Exposure: Eliminating Glare and Facial Shadows
Mastering natural daylight and two-point artificial lighting setups.
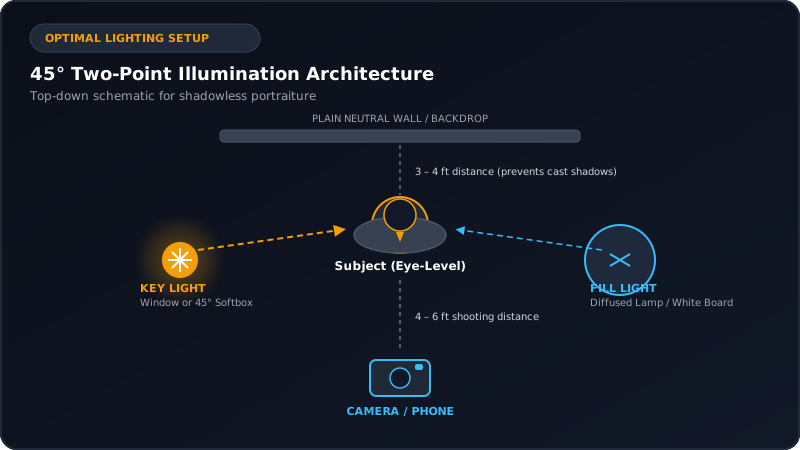
Natural Daylight (45° Window)
Position the subject facing an open window at a 45-degree angle. Daylight provides natural color balance, subtle jawline contouring, and sharp eye reflections without harsh hotspots.
Two-Point Artificial Lighting
Place a primary Key Light at 45° left, slightly above eye level. Position a secondary Fill Light or white foam-core reflector at 45° right to soften cheek and neck shadows.
Lighting Pitfalls to Avoid
Never use direct on-camera flash (creates blinding forehead glare). Never position the subject directly in front of bright windows (causes dark silhouettes).
5. Visual Do's & Don'ts Comparison Guide
Compare proper capture techniques against common photographic pitfalls.

Position camera directly at eye level. Look straight into the lens with squared shoulders. Maintain a 10–15% buffer above hair crown and around torso.
Avoid handheld selfies from high or low angles that distort facial geometry. Do not crop the top of hair or cut off jawlines tightly in the raw image.
Clear prescription eyeglasses are fully acceptable. Tilt your head slightly or adjust lamp angle to prevent flash reflections from obscuring your pupils.
Dark tinted sunglasses and wide-brim hats that cast deep shadows over the brow or conceal the eye contour should be removed.
6. DIY Background Setup & The 3-to-4 Foot Spacing Rule
Eliminating backdrop shadows with physical separation and simple home materials.

Solid Untextured Wall
An empty white, off-white, or light grey interior wall without picture frames or switches.
Ironed White Sheet
An ironed white cotton bedsheet pinned tightly across a doorway frame.
The 3–4 Foot Rule
Never lean against the wall. Standing 3–4 feet forward allows ambient light to dissolve background shadows completely.
7. Composition, Framing & CR-80 Card Proportions
Harmonizing eye-level axis, vertical center balance, and headroom buffer.

8. Interactive CR-80 Card Framing Sandbox
Test how different framing alignments fit within standard keepsake dimensions.
Optimal Framing Composition
Head is centered within the upper two thirds of the frame. Shoulders are squared and visible, providing balanced negative space around the portrait when rendered onto the card.
Too Close (Tight Crop)
The camera was positioned too close to the subject. This cuts off the crown of the head and chin contours during layout assembly. Take a step back and leave moderate breathing room.
Too Distant (Small Subject)
The subject occupies less than 40% of the vertical frame height. Digital enlargement may reduce apparent sharpness. Stand closer so your upper chest and face fill the viewfinder.
Tilted Facial Axis
The head or phone is tilted at an angle. For formal commemorative cards, look straight ahead with ears aligned horizontally.
9. Signature Capture Guidelines
Ensuring high-contrast digital reproduction on your keepsake.
Dark Ink & White Paper
Sign with a dark black or navy ink pen on plain white, unlined paper. Avoid faint pencil or textured lined paper.
Bright, Shadow-Free Light
Take a photo flat from directly above in bright daylight, ensuring hand and phone do not cast shadows.
JPEG or PNG Upload
Upload as a clear JPEG or PNG image (up to 10MB) alongside your portrait photo in the personalization form.
10. Common Mistakes & Quality Troubleshooting
| Issue / Mistake | Root Cause | Actionable Solution |
|---|---|---|
| Motion Blur / Soft Focus | Shutter speed too slow or camera shake | Mount camera on a tripod or stable surface, increase room lighting, and use a timer. |
| Flash Reflection Hotspots | Direct on-camera flash bouncing off skin | Turn off on-camera flash; rely on 45° indirect daylight or diffused lamp sources. |
| Dark Silhouette / Underexposure | Backlit window or lamp behind subject | Position light source in FRONT of the subject at 45°; never shoot towards a window. |
| Cast Background Shadows | Standing too close to the rear wall | Move 3 to 4 feet forward away from the wall to let ambient light disperse shadows. |
| Distorted Facial Proportions | Handheld selfie taken too close with wide lens | Have another person shoot from 4–6 feet away using the rear 1x optical camera. |
| Floating Head Effect | White shirt blending with white wall | Wear a contrasting dark or medium solid colored shirt (navy, black, dark grey). |
11. How to Upload on idgaga Product Pages
Select Product
Navigate to your chosen keepsake template on /products.
Enter Details
Fill in commemorative fields in the Personalization Form.
Upload Files
Click Upload Photo and Signature (JPEG/PNG up to 10MB).
Add to Cart
Files securely stored; edit freely on /cart anytime.
12. Interactive Pre-Upload 8-Point Checklist
Verify your photo against these 8 essential criteria before placing your order.
Frequently Asked Questions
Verified answers regarding upload formats, official ID benchmarks, device calibration, and data security.
Ready to Customize Your Keepsake?
Explore our regional commemorative card templates and create your custom novelty pass in minutes.